Olympus+ ceramic water filter 
Antimicrobial water filter, which destroys microbes inside the device and on the surface of the ceramic filter in 2 hours – Under-sink installation Installation and maintenance instructions – Under-sink installation
Device Description – Package Contents
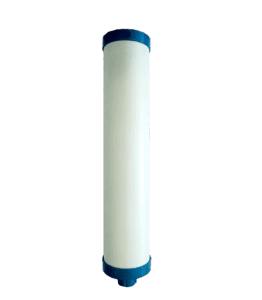
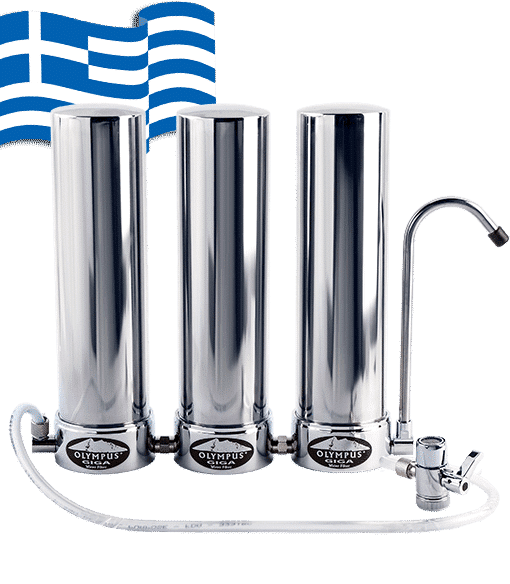
 Device Description – Package Contents 1. Antimicrobial copper alloy base 2. Stainless steel metal cover (water compartment) 3. Water inlet tap (screwed into the base (1) with Teflon tape on the thread) 4. Metal connector fastener. (First pass it through the hoses (5 and 11) and screw it tightly to the inlet and outlet nozzles (3 and 9), after having previously inserted the hoses (5 and 11)) 5. 1/4″ plastic hose (connects to nozzles 3 and 9 respectively) 6. Metal connector of the flexible hose (5) with the tap (7) (first pass the connector through the hose (5) and screw) 7. 1/4″ water supply tap to the filter (connects to the cold water) put teflon or hemp on the thread and connect it to the nipple (8) 8. Nipple (T-distributor) for the water supply of the kitchen tap and the filter. (Put teflon tape on the thread and connect it to the power supply). 9. Drain valve for filtered tap water (Screw into the base (1) with Teflon tape) 10. Metal connector 11. 1/4” plastic hose 12. Metal nozzle for connection to the tap (pass it through the hose (11)) 13. Plastic wedge (insert it into the plastic hose (11) for reinforcement) 14. Plastic conical cylinder for sealing (nipple) (pass it through the hose (11)) 15. Metal nut for fixing the tap (screw it completely onto the tap thread to stabilize the tap at the bottom of the sink) 16. Metal serrated (growth) washer for fixing (place under the plastic washer (17)) 17. Plastic support washer (place under the sink) 18. Washer rubber seal (place under the sink) 19. Rubber sealing washer (place above the sink) 20. Oval metal base to support the faucet (remove the blue nylon protective cap) 21. Stainless steel swivel faucet. 22. Ceramic filter - replacement filter cartridge (screws into the center of the metal base of the device) 23. Large rubber sealing washer between the metal base (1) and the metal cover (2) 24. Copper alloy antimicrobial disc (installed), to destroy microbes Operating parameters – Maximum Operating Pressure: 7 BAR – Operating Temperature: 38 ° C (100 ° F) – Minimum operating pressure: 1 BAR (Reduced flow) – Recommended operating pressure: 3 – 7 BAR – Minimum operating temperature 5 °C (41 ° F). – Recommended filter flow rate for perfect filtration 1.5 – 2.5 liters/minute at a network pressure of 3 – 3.5 BAR INSTALLATION ORDER OF RESERVE CASSETTES FOR DOUBLE OR TRIPLE FILTER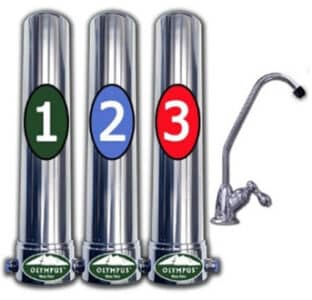
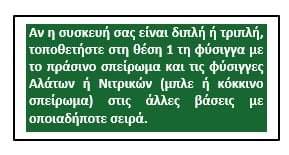
 IMPORTANT: Place the inlet (3) and outlet (9) valves in the base(s) and wrap Teflon tape (not included) around their threads to prevent water leaks. 1. INSTALLATION: ( The customer is responsible for the correct and safe installation of the filter) The filter should be placed vertically under the sink, close to the water source, and its tap should be placed in the desired location on the sink. Cut the 2-meter hose included in the package into 2 pieces of a size so that when changing the filter, you can remove the device from the cabinet. (If the hose is cut at an angle, you will have a leak) 2. CAUTION Make sure the water inlet hole in the filter follows the direction of the arrow on the underside of the metal base (1) of the appliance (see figure 1). If is connected backwards, the ceramic cartridge will clog or break . SINK HANDLE AMPLIFICATION – Drill a 11 mm (millimeter) diameter hole in the sink, at the desired location for the faucet (21), using a suitable drill bit ( drill first with a 6 millimeter drill bit ). – Before placing the faucet on the sink, first pass the nickel-plated metal base (20) through the faucet pipe, after removing the protective nylon layer, and pass the larger black rubber sealing washer (19) underneath. – Place the faucet in the hole you drilled in the sink, and on the side of the faucet located at the bottom of the sink, place the accessories (18), (17), (16) in the order shown in the drawing and screw the metal nut (15) completely to seal and fix the faucet to the countertop. – Pass the metal retainer (10) onto one end of the hose (11). Connect the hose (11) to the outlet nozzle (9) and screw the metal clamp (10) firmly. – On the other end of the hose (11), first pass the metal nozzle (12), then the oval plastic cylinder (nipple) (14) and then place the plastic wedge (13) inside the plastic hose to stabilize the nipple (14) in place. Screw the metal nozzle (12) firmly onto the thread on the tap stem. – Screw the cartridge (22) into the filter base (1) ( casual ), without tightening it too much, so as not to break it the plastic thread or ceramic filter or reduce the water flow. – Screw the metal cover of the appliance (2) firmly onto its base. Now open the tap and some black water may come out. FROM the filter tap for the first time, after rinsing the activated carbon . 3. CAREFUL: The first time and each time you change the cartridge, let the water run for 10 minutes. Do not use the filter for 24 hours. After the 24 hours, let it run for 2-3 minutes and the filter is ready for use. Also, if the filter remains unused for more than 3 days, let the water run for 2-3 minutes. 4. CAREFUL: Only use cold water through the filter. If you use hot water, the binding and sealing materials of the cartridge will come loose and sediment, mud, rust, as well as chemical elements in the water such as chlorine, etc., will not be retained by the filter. 5. FILTER REPLACEMENT (CASSETTE) When replacing or cleaning the ceramic cartridge, it is a good idea to make sure that any cuts or wounds on your hands are covered to avoid contact with germs that may have settled on the outside of the ceramic filter and that the antimicrobial copper in the base has not yet been able to destroy them, as it takes approximately 2 hours to destroy them. Otherwise, to replace the cartridge, follow the procedure as for the initial installation of the filter. To unscrew the metal cap (2), first turn off the water supply to the filter and at the same time open the filter tap (21) on the sink to release the pressure and unscrew the metal cap (2) more easily. Turn off the water supply to the filter when you want to: A) Completely shut off the water supply to the filter. B) Clean the cartridge.
C) Cartridge replacement. D) When you leave home for several days. 6. MAINTENANCE – CLEANING THE CERAMIC CARTRIDGE Every 3-4 months or whenever the water flow from the appliance tap decreases visibly (which means that the ceramic filter cartridge has become "clogged" with sediment, rust, mud, sludge, limescale, etc.), remove it from the appliance and, with cold water under the tap (without detergents), rub it well over the entire surface with the metal part of the dish sponge, or with a harder metal material, or even with sandpaper (number 80), to clean it and improve the water flow After rinsing it thoroughly, put it back in place. 7. RECOMMENDED FILTER FLOW – IT’S TIME TO REPLACE THE REPLACEMENT CASSETTES IMPORTANT: The highest filter efficiency is achieved when the water flow through the filter does not exceed 1.5 to 2 liters per minute. The cartridge capacity is for 8,000 liters of water or for 10-12 months , whichever comes first. The cartridge life may be reduced in cases of networks loaded with impurities such as mud, rust, sludge, soil, limestone, etc., or in periods of drought, when the load on the water supply networks is very high (due to low water levels). In these cases, the filter must be cleaned much more often and replaced earlier if, despite cleaning, the water flow from the appliance tap is not restored . But regardless of the number of liters of water that will pass through the filter, you MUST replace the cartridge at least every 10-12 months, because from the moment it gets wet, its materials weaken month by month, and the water that passes through the filter will pass unfiltered. 8. MAINTENANCE OF THE DISC AND ANTIMICROBIAL BASE On the surfaces of antimicrobial copper alloy materials, and more specifically inside the base (4) and the disc (6) located therein, superficial discoloration may occur due to natural oxidation of the antimicrobial copper, deposits of various materials originating from water supply networks, such as rust, mud, etc. In these cases, these deposits, which do not hinder the overall operation of the filter in any way, are good, both for aesthetic reasons and for reasons of cleanliness of the filter chamber, be removed in the following way: a) Clean both surfaces of the antimicrobial disc thoroughly with something rough, such as pot wire, coarse sandpaper, etc. b) Clean the inside of the antimicrobial base in the same way to remove any rust-like deposits. 9. METAL DEVICES CLEANING PROCEDURE Wipe the appliance with a soft cloth slightly dampened with lukewarm water. Avoid using bleach or any chemical detergent or bleaching agent, or metal scouring pads, as these will leave marks on the metal surface of the appliance. 10. IMPORTANT! To protect the filter, after any interruption to the water supply, ALWAYS open the tap to let it run for a while before using the filter. 11. WARNING: The OLYMPUS+ water filter is intended for use in waters controlled by municipal or local authorities and which are suitable for human consumption. 12. BEWARE OF WATER PRESSURE If the mains pressure is high, install a pressure reducer before the water filter. However, whether the mains pressure is high or low, it is essential to install a one-way (anti-shock) valve (available at plumbing stores) so that in the event of a sudden increase in mains pressure or a momentary snowstorm, the hoses or the filter unit do not break and cause flooding. When leaving home for several days, you should always close the water supply tap to the filter. View the product instructions in PDF format by clicking here.